

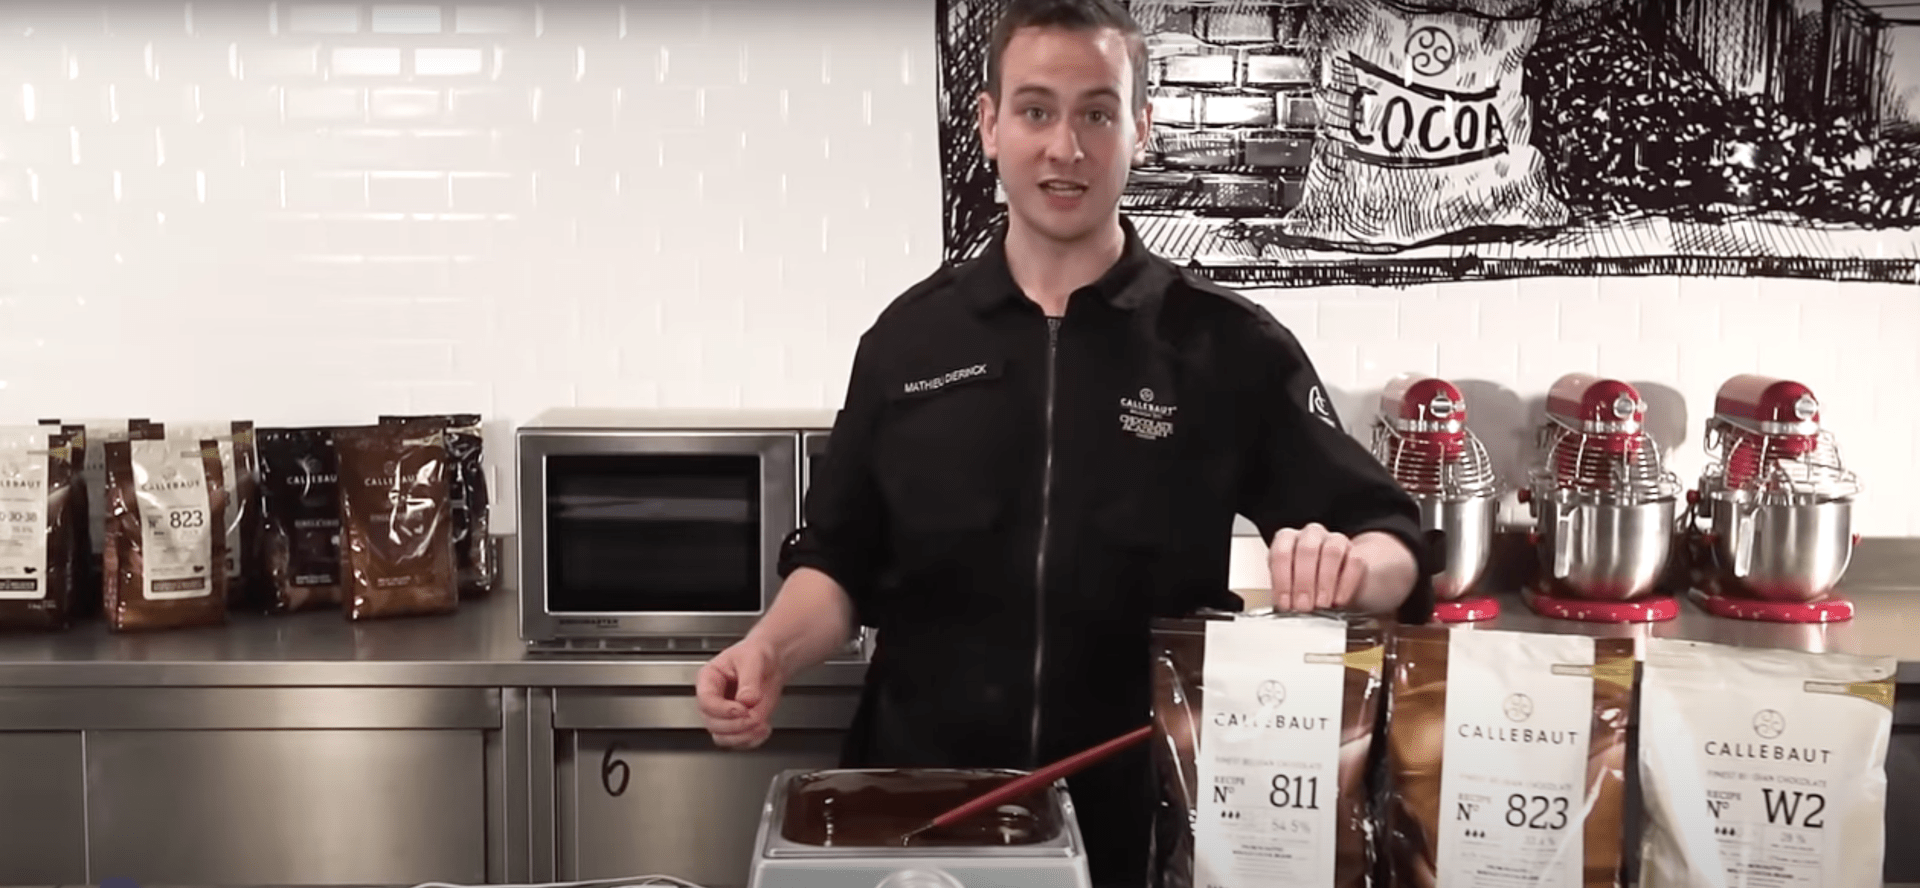
Metoda „seeding” polega na temperowaniu czekolady poprzez dodanie niewielkiej ilości nieroztopionych Callets™ do roztopionej czekolady. Jest szybka, łatwa i niezwykle skuteczna.
WARTO WIEDZIEĆ
Dlaczego płynność jest tak ważna?
Płynność czekolady decyduje o grubości skorupki i "trzasku" Twoich produktów czekoladowych: im bardziej płynna czekolada, tym cieńsza i bardziej chrupiąca będzie skorupka.
Użycie czekolady o odpowiedniej płynności oszczędza również czas: możesz odlać duże formy za jednym razem, używając mniej płynnej czekolady. Czekolada o większej płynności jest lepsza do form z dużą ilością detali, ale trzeba będzie napełniać formę czekoladą 2 do 3 razy.
Dlaczego tak ważne jest prawidłowe wstępne krystalizowanie czekolady?
Pomaga to czekoladzie stwardnieć, nadaje jej piękny satynowy połysk i pyszny "trzaśnięcie". Powoduje to kurczenie się czekolady podczas chłodzenia, co ułatwia wyjmowanie z formy. Źle skrystalizowana lub nieskrystalizowana czekolada stanie się szara i nie będzie miała apetycznego połysku.
Czym jest temperowanie lub wstępne krystalizowanie?
Celem temperowania czekolady jest wstępna krystalizacja masła kakaowego, co jest ważne, aby czekolada była gotowa do dalszej obróbki. Podczas temperowania masło kakaowe w czekoladzie przyjmuje stabilną formę krystaliczną. Gwarantuje to idealny produkt końcowy o satynowym połysku i twardym "trzasku". Powoduje również kurczenie się czekolady podczas chłodzenia, co ułatwia wyjmowanie z formy. Jeśli czekolada zostanie po prostu roztopiona (w temperaturze od 40 do 45 °C), a następnie pozostawiona do ostygnięcia do odpowiedniej temperatury roboczej, gotowy produkt nie będzie błyszczący. Jeśli włożysz niewielki wysiłek w odpowiednie doprowadzenie czekolady do właściwej temperatury roboczej, masz gwarancję uzyskania pożądanego rezultatu końcowego. I to właśnie rozumiemy przez temperowanie: doprowadzenie czekolady do właściwej temperatury roboczej, upewniając się, że struktura krystaliczna masła kakaowego w niej jest stabilna. Jak dowiesz się poniżej, trzy kluczowe zasady prawidłowego temperowania to czas, temperatura i ruch.
Temperowanie z Callets™
Wstępna krystalizacja jest bardzo łatwa, jeśli do roztopionej czekolady dodasz czekoladę, która została już stymulowana. I w tym miejscu Callebaut Callets™ okazują się być prawdziwą zmianą: masło kakaowe w tych małych kroplach czekolady ma już odpowiednią strukturę krystaliczną. Po dodaniu do roztopionej czekolady, wyzwala to reakcję łańcuchową, w wyniku której czekolada zostaje prawidłowo skrystalizowana. Wymagana ilość Callets™ zależy od temperatury zarówno roztopionej czekolady, jak i Callets™. Kiedy roztopiona czekolada ma temperaturę około 40°C, zasadą jest dodanie 5% Callets™ w temperaturze pokojowej (tj. od 15 do 20°C).
Krok 1
Roztop czekoladę w roztapiarce do czekolady (ustaw termostat na 45 °C).
Krok 2
Obniż termostat (do ± 31°C dla czekolady gorzkiej lub do ± 29°C dla czekolady mlecznej i białej) i natychmiast dodaj 5% Callets™ w temperaturze pokojowej.
Krok 3
Dobrze wymieszaj czekoladę, aby dokładnie i równomiernie wymieszać stabilne kryształy Callets™. Czy Callets™ topią się zbyt szybko? To oznacza, że Twoja czekolada jest nadal za gorąca. Dodaj więcej Callets™ aby obniżyć jej temperaturę i kontynuuj mieszanie.
Krok 4
Otrzymasz lekko zgęstniałą czekoladę, która jest gotowa do użycia.
Która czekolada Callebaut wymaga temperowania?
Każdy rodzaj czekolady powinien być temperowany, zanim użyjesz go do formowania pralinek i pustych figurek, lub do oblewaniu ciast i czekoladek. Krótko mówiąc, zawsze, gdy czekolada ma mieć piękny satynowy połysk i twardy "trzask", temperowanie jest absolutnie kluczowe.
Jeśli dodajesz czekoladę do dań jako składnik smakowy (np. do musów czekoladowych lub kremów bawarskich), wystarczy ją po prostu roztopić bez temperowania. Wszystkie nasze przepisy wyraźnie wskazują, czy Twoja czekolada powinna być temperowana, czy nie.
Comments
Przesłane przez Nisreen Manarious na Sat, 03/14/2026 - 10:20
Thank you for these helpful tutorials. I have a question about the seeding method. When lowering the temperature using this method, do I still need to cool the chocolate down to 27°C and then raise it to 31°C? Or does the seeding method allow me to go directly from about 45°C to 31°C by adding the seed chocolate? Could you please confirm?
Przesłane przez Joël na Mon, 03/16/2026 - 15:04
In reply to Thank you for these helpful… by Nisreen Manarious
Hello Mr Manarious, No, you do not need to drop to 27°C. With the seeding method described in your tutorial, you can go directly from 45°C to your working temperature (±31°C for dark) by adding the Callets™.
Przesłane przez STEPHANIE FREE na Wed, 05/27/2026 - 19:04
Thank you very much for the helpful tutorial. I also have a question about the seeding method. I use a chocolate melter to temper, and as the tutorial notes, I turn it up to 45 degrees Celsius to melt the 811 Dark Chocolate Callets. However, the Callets melt completely and are totally fluid before reaching 45 degrees Celsius. Should I continue to heat the chocolate until it reaches 45 degrees, then turn the temperature down to 31-32 degrees and seed; or should I turn the temperature down and begin seeding once the chocolate has completely melted but has not yet reached 45 degrees?
Przesłane przez Miranda K - Ch… na Thu, 05/28/2026 - 23:44
In reply to Thank you very much for the… by STEPHANIE FREE
Hi, Stephanie. Excellent question!
You need to melt dark chocolate to at least 40°C to ensure that all of the cocoa butter is completely melted. This way, you're sort of starting with a "blank slate." The callets will likely be pretty well melted by around 36°C, especially if you are stirring, so that sounds fine, but I would also recommend grabbing a digital thermometer and checking the temperature yourself, just in case the thermostat in your melter isn't accurate.
Przesłane przez Yara Al na Tue, 06/02/2026 - 18:33
Thank you so much, the video is so helpful. I was just wondering can I use 75% of milk chocolate and 25% of the dark and how would the tempering work?
Przesłane przez Miranda K - Ch… na Wed, 06/03/2026 - 16:15
In reply to Thank you so much, the video… by Yara Al
Hi, Vara.
Yes, you can combine milk and dark chocolates and crystallize them. You will need to adjust the temperature - milk chocolate shouldn't be heated quite as high as dark, and since it will make up the majority of the mixture, I would follow the temperature recommendations for milk chocolate for the entire process. You can find the crystallization curves for all 5 colors of chocolate on this page: https://www.callebaut.com/en-US/guide-different-tempering-methods
Przesłane przez Jennifer Custeau 2 na Tue, 06/23/2026 - 16:57
Bonjour, je travaille avec une petite tempéreuse, donc avec une petite quantité de chocolat. La température n'est pas toujours stable, alors j'ai toujours mon thermomètre dans les mains afin de confirmer les degrés. En lisant les commentaires, je suis un peu confuse. Avant je montais la température à 45, je mettais mes Callets, je descendais à 29 ou 31 selon le chocolat et je moulais. J'ai ensuite découvert qu'on devait abaisser la température à 27 avant de remonter à 29 ou 31. Sauf qu'en lisant les commentaires, vous semblez dire que ce n'est pas nécessaire ? Je veux réduire le nombre de fois où je me retrouve avec des taches blanches ou jaunâtres à cause d'un problème de température.
Aussi, puisque ma tempéreuse continue de chauffer le chocolat même lorsque je la ferme, j'enlève le bac de chocolat pendant que je fais mes premiers moulages. Jusqu'à quel degré peut descendre le chocolat afin que je puisse l'utiliser encore pour d'autres moulages sans problème ? Vous donnez le maximum qu'on ne doit pas dépasser pour travailler, mais est-ce qu'il y a un minimum de degrés aussi ?
Merci beaucoup !
Przesłane przez Miranda K - Ch… na Tue, 06/23/2026 - 22:43
In reply to Bonjour, je travaille avec… by Jennifer Custeau 2
Bonjour !
Tout d'abord, les températures exactes varient selon le chocolat utilisé. Référez-vous toujours aux températures indiquées sur la courbe de cristallisation figurant sur l'emballage.
Oui, s'il s'agit d'une petite quantité, vous pouvez commencer à travailler le chocolat dès qu'il a atteint sa température de travail ; inutile de le chauffer davantage. Cela dit, j'aime procéder ainsi pour les projets importants. Ce n'est pas strictement nécessaire, mais cela offre une certaine sécurité contre les problèmes que vous mentionnez.
Quant à la température minimale, vous constaterez qu'une fois le chocolat descendu en dessous d'un certain seuil, il devient trop épais pour être travaillé. Il ne remplira pas correctement les moules aux détails fins et donnera une coque trop épaisse aux bonbons moulés ou aux pièces enrobées à la main. Là encore, cela dépend du chocolat utilisé, mais vous remarquerez vite le moment où cela se produit.
Si vous pouvez maintenir la température de travail à l'aide d'un chauffe-chocolat, c'est l'idéal. Sinon, veillez à remuer le chocolat de temps en temps pour bien répartir la chaleur. Ne posez pas le récipient contenant le chocolat directement sur le plan de travail, car cela accélérerait son refroidissement ; isolez-le plutôt à l'aide d'un torchon, d'une planche en bois ou même d'un couvercle de boîte en plastique.